Background
Having studied Electrical Engineering in college, I was only exposed to C and C++, which then led to embedded-related roles where I gained experience laying out PCBs, soldering components, programming microcontrollers, and currently, dealing with kernel drivers. However, I haven’t had the chance to work on web-facing types of applications yet, and wanted to learn it, hence this project.
The motivation was to learn Javascript, and how web applications work, in general. I went through tutorial hell for the first three months or so earlier this year, earnestly spending hours going through videos of a Udemy course on web development I bought. And while I did learn some, I didn’t feel I had a solid grasp on the new concepts that I have learnt, even after coding along with the videos that I’ve watched. That’s when I decided I had to program something from scratch. I spent a fair bit of time deciding on what to build. But as I’m typing this post, I realised it doesn’t actually matter. You will get invested in it once you get started. Just like how you wouldn’t choose to code some stuff you are doing at work, or a coursework assignment, you are still invested in it having started working on it, having to fix bugs encountered along the way. But I digress.
I finally did settle on the idea of some kind of game, the pixel art graphics won me over, and there’s lots of scope for future expansion. Making a game/visual novel offers me the chance to exercise my latent, creative desires, and I get to indulge in writing cheesy dialogue. So, what’s there not to like, when there’s some frivolousness mixed in? ;)
Getting Started
To get some clues on how to get started, I Googled around, and found two posts that were very helpful:
Almost all the information I needed for my project are in the above two posts.
Tiled
There will be no game without any sort of graphics, so creating the tilemap would be the first step. Following the example of the two posts above, I made the tilemap using the Tiled map editor. Since I have Ubuntu setup on my machine, I installed it through the snap package manager
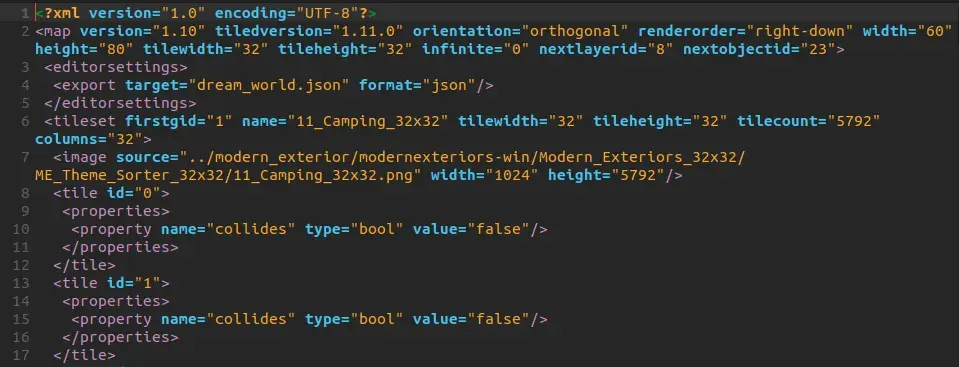
Prior to working on this, I did not have the slightest idea on how game graphics are generated. Now, I probably know a 1% more :). For games based on 2D style pixel art, the graphics consist of tilemaps. Tilemaps are built based on tilesets, which consist of tiles of pixel art. These tiles are commonly found in sizes of 16 x 16 pixels, or 32 x 32. Using these tiles as the building blocks, you can then combine them to create your game graphics. The tilemap generated is just a mapping between a particular tileset, and it’s place in the scene, along with other properties such as if that tile is a collidable tile etc. This makes rendering the graphics memory efficient. The .tmx file generated by Tiled is basically an xml file containing the mapping:

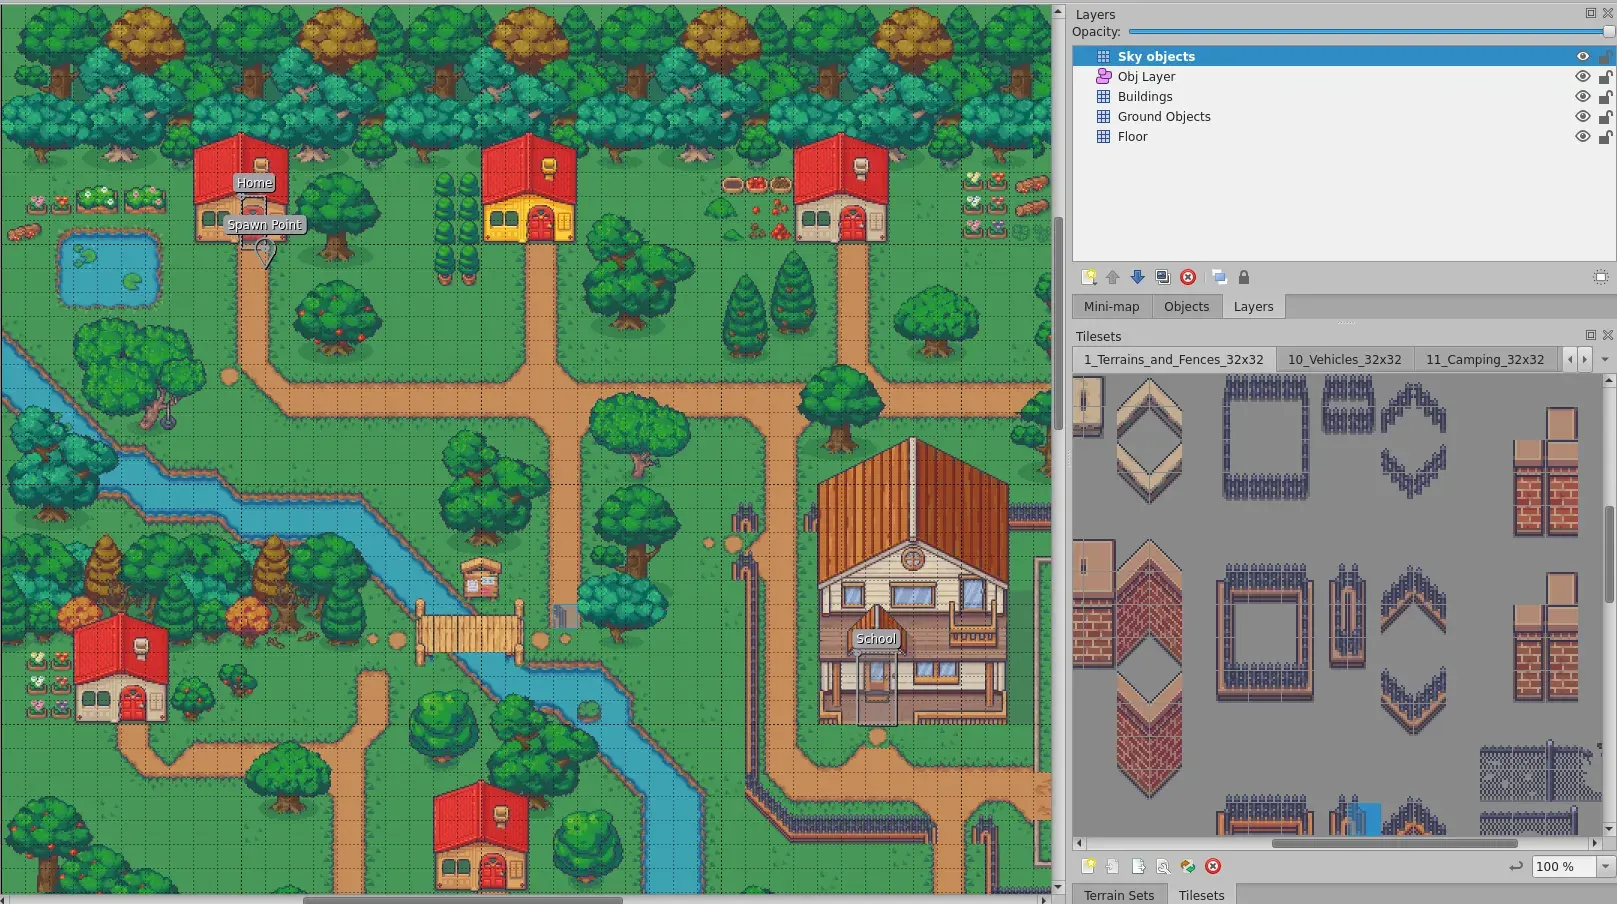
Given that these tiles are 2D, how would you generate a 3D-like image? How would you render a building on top of grass? How would you make sure that the character isn’t colliding with the top of a building for example? The answer lies in layers. Tiled allows you to create layers in your tilemap, and the order of the layer matters, with the layer being rendered on top of its previous from bottom to top. Each layer will be rendered separately by Phaser, and in Phaser, you can set the collisions with each layer individually. Therefore, you can have the character not collide with any of the tiles in the “sky layer”. I found that 4 layers was enough for mine:

There’s a whole lot more you can do with Tiled, I’m barely scratching the surface. This series of videos was very useful for me when I was trying to familiarize myself with the software. This one could also be useful. However, I struggled with using the Terrain feature. I ultimately gave up as I really wanted to get my tilemap ready and get started with code.
Mike’s post above is very complete when it comes to detailing the steps needed to get the tilemaps created in Tiled to be rendered with Phaser, so I would not be expanding on it.
Code
As I was also learning React before working on this, I wanted to include its use in
this project. Looking at Pablo’s game where he created an RPG style dialog box, I liked
it and wanted to include that feature as part of mine as well. And it is also a perfect
simple exercise in practising the core features of React, namely useState, and in
getting it to work with Phaser, useEffect and useRef.
Phaser released a great template to get started with projects using React one or two months before I got started on this, so it was immensely helpful. The key files to pay attention to are:
PhaserGame.jsxApp.jsx
PhaserGame.jsx is basically a “Reactified” component of a normal Game.js setup.
To get it to work with the Phaser framework, it makes use of refs. The same can be
said for the App component, which passes(forwardRef) its ref to the child PhaserGame
component. The ref within PhaserGame (game) holds a reference to just the game
object created by Phaser on being rendered the first time, the ref within App component
(ref) holds a reference to both the game object and the Phaser scene that is being
rendered. Depending on the scene the App component may conditionally render other
pure React components.
if (game.current === undefined) {
  game.current = StartGame("game-container");

  if (ref !== null) {
    ref.current = { game: game.current, scene: null };
  }
}
StartGame creates the Phaser Game object, which renders the game in a canvas
element under a parent DOM node with game-container id.
PhaserGame gets notified of a scene change through the EventBus handler
which runs in a useEffect escape hatch, and the handler updates its
parent App component reference to the scene:
useEffect(() => {
  EventBus.on("current-scene-ready", currentScene => {
    if (currentActiveScene instanceof Function) {
      currentActiveScene(currentScene);
    }
    ref.current.scene = currentScene;
  });

  return () => {
    EventBus.removeListener("current-scene-ready");
  };
}, [currentActiveScene, ref]);
And that’s basically the gist of the code structure.
I’ve added a DialogBox.jsx component to hold the background dialog image I
found off the net. This component keeps track of other states, such as if the
message displayed is the last for a particular game state, and user input on
displaying the next message, and closing the dialog box. With all these information,
it then conditionally renders the Message component, which takes care of creating
a typewriter effect using delays.
import { useState } from "react";
import Card from "@mui/material/Card";
import Button from "@mui/material/Button";
import Message from "./Message";
import { ButtonBase, CardContent } from "@mui/material";
import NavigateNextIcon from "@mui/icons-material/NavigateNext";

function DialogBox({ msgs, width, height, bottomOffset, callback }) {
  const numMsgs = msgs.length;
  const [msgIdx, setMsgIdx] = useState(0);
  const [isLast, setIsLast] = useState(numMsgs == 1);
  const [showCursor, setShowCursor] = useState(false);

  return (
    <Card
      sx={{
        backgroundImage: "url('../assets/dialog_box.png')",
        backgroundSize: "100% 100%",
        padding: "2%",
        position: "absolute",
        transform: "translateX(-50%)",
        left: "50%",
        bottom: `${bottomOffset}px`,
        height: `${Math.ceil(height / 4)}px`,
        width: `${width / 1.5}px`,
      }}
    >
      <CardContent
        sx={{
          height: "75%",
          overflowY: "scroll",
          display: "flex",
          flexGrow: "1",
          flexDirection: "column",
        }}
      >
        <Message
          key={msgIdx}
          msg={msgs[msgIdx]}
          delay={50}
          callback={() => {
            setShowCursor(true);
          }}
        ></Message>
        {isLast && showCursor && (
          <Button
            sx={{ alignSelf: "flex-end" }}
            onClick={() => {
              setMsgIdx(0);
              setShowCursor(false);
              callback();
            }}
          >
            Ok
          </Button>
        )}
        {!isLast && showCursor && (
          <ButtonBase
            sx={{ alignSelf: "flex-end" }}
            onClick={() => {
              setShowCursor(false);
              setIsLast(msgIdx + 1 === numMsgs - 1);
              setMsgIdx(msgIdx + 1);
            }}
          >
            {" "}
            {<NavigateNextIcon fontSize="large"></NavigateNextIcon>}
          </ButtonBase>
        )}
      </CardContent>
    </Card>
  );
}

export default DialogBox;
import React, { useState, useEffect } from "react";

function Message({ msg, delay, callback }) {
  const [idx, setIdx] = useState(0);
  const [text, setText] = useState("");
  const length = msg.length;

  useEffect(() => {
    const timeout = setTimeout(() => {
      if (idx < length) {
        setText(text + msg[idx]);
        setIdx(idx + 1);
      } else {
        // console.log('end');
        callback();
      }
    }, delay);
    return () => {
      clearTimeout(timeout);
    };
  }, [text, msg, idx]);

  return <div style={{ fontSize: "1.2em" }}>{text}</div>;
}

export default Message;
I’ve added more events to the EventBus to handle the novel’s state machine. Aside from just displaying messages to the player, I tried adding some interactivity to the novel by adding glow effects and adding a minimap to the viewport so that the player would get hints on where to go next to trigger the next state.
Phaser recently added the capability to add a glow effect in its API, which really made it easy for me. Previously to do this, you would have to mess directly with the WebGL APIs themselves. This glow function can be added to any game object in Phaser.
So, I created polygons/rectangles in the Object Layer of my tilemap. Object layers are usually used to hold information that isn’t being rendered, a popular example would be the spawn point of characters and NPCs. In this case, I created polygons from the coordinates listed in the Object Layer for the points of interest, then added glow effects to them:
this.objLayer.objects.forEach(e => {
  if (e.name === objName) {
    const points = e.polygon.map(({ x, y }) => [x, y]).flat();
    glow = this.add.polygon(e.x, e.y, points).setOrigin(0, 0);
    glow.setStrokeStyle(4, 0xefc53f);
    glow.postFX.addGlow(0xffff00, 8, 0, true, 0.05, 24);
  }
});
I’d just to like to bring special attention to the 5th parameter in the addGlow method above. It has this signature, and the fifth is related to the quality of the glow effect. Be careful about setting this value, I found that increasing this value much higher than the default 0.1 slows down the browser a lot. This took me a while to figure out, as I suspected other bugs in my code, but after dialling this down, the browser wasn’t terribly laggy anymore. Otherwise, it sent the browser to an unusable state, with seconds passing before a mouse click or scroll was processed.
That’s about all I have worked on at present, I realized I’ve forgot to share how I got the main character generated. This was created using this really awesome free Universal LPC Spritesheet Generator There’s tons of options in customizing your character, and you are then given a huge png file with all kinds of animations such as walking, running, jumping etc. I then used TexturePacker to generate the spritesheet needed for the walking animations in Phaser. However, TexturePacker isn’t free after the two week trial, so I have to find an alternative when I add more characters to this.
What’s Next
This is still a very simple application at this point. Generating the tilemap definitely took longer than I expected, and I’ve come to appreciate how much detail is needed to even create a decent-looking tilemap. Even now, there’s a severe lack of NPCs, which I would have to work on next.
In all honesty, there doesn’t seem to be the need to have the player navigate the character, as this reads more like a visual novel at this point. Perhaps I could remove it by adding pathfinding to this. In addition, while the simple state machine is sufficient for what it is currently, I could use this opportunity to reimplement this with Redux, taking inspiration from this post And finally, my dream is to add some multiplayer kind of component to this, which would involve a backend. I need to figure out the scope and features that would make a multiplayer fit into this. So in summary, here’s what I have in plan next:
- Pathfinding
- Redux
- Multiplayer
Here’s to hoping I keep the momentum up for further development! By the way, the full source code for this is available to view here